
Finally! The long-awaited vacation is just around the corner. We are looking forward to unforgettable moments that we can live off for a long time. Of course, we want to preserve the best memories and moments and share them with our loved ones. That’s exactly why taking photos while traveling is so popular.
Alex Lörtscher knows what he’s talking about. The Swiss professional photographer combines both worlds: That of the passionate photographer, but also that of the family man and passionate traveler. He shares his personal tips to make traveling photography easy for you
The iPhone is enough: No need for expensive photography equipment when traveling
The good news right off the bat is that you don’t need expensive photography equipment when you travel. Some people deliberately buy a special camera just for vacations and vacations – but they don’t really need it.
The practical option for trips and stays away from everyday life is your iPhone. There’s a reason for this: smartphones can now take photos that are hardly any different from expensive photographic or professional equipment. However, there is one prerequisite: You should be able to operate the iPhone properly so that the little wonder device can unfold its full potential.
This is exactly where Alex’s iPhone photography course comes in. The professional photographer from Uster is passionate about taking photos with his iPhone in his free time. In his online course, he teaches ambitious iPhone photographers key techniques and principles as he knows them from his everyday work. So if you want to get the most out of your iPhone while traveling, the compact online course teaches you everything you need to know.
Travel photography: Preparation is the first step
Before you start your trip, you should inform yourself about your destination. A travel guide or some research in Google will help you – you don’t need a travel agency anymore. There are hardly any insider tips. But more about that later.
By the way, you can find a lot of inspiration on Pinterest. Alex also likes to look at the local postcards when he travels. They give good clues for great photo motifs in the region and show which places are particularly worth a visit.
The iPhone is the ideal travel companion, also because the iPhone – depending on the model – already has a telephoto lens, a wide-angle lens and an ultra-wide-angle lens, saving you money, space and weight in your luggage.
By the way, a first tip right at the beginning: It is recommended to use the integrated lenses of your iPhone when taking pictures while traveling. Remember not to zoom with your fingers. Digital zooming leads to quality loss in the image!
The basics: Use your feet
Another tip that is related to this and that you should mentally store in the «Basics»: Use your feet! Together with the different lenses you can take great photos while traveling. No professional iPhone photographer has ever fallen from the sky without effort and movement… 😉 So always stick to the basics.
So always keep moving when taking photos and look at your subjects from different directions. Depending on the weather and light, the contrasts in the image will also look different. Play with it and try to capture different perspectives. This way you will give the viewer of your photos different insights as well.
Talk to locals
Back to the insider tips already mentioned. With TripAdvisor, Google, Pinterest & Co. there are hardly any classic insider tips left, as you might know them yourself or from stories told by parents, grandparents or older friends.
When traveling, it is therefore worth talking to locals. They are very familiar with the region and its special features and may even know one or the other place, which is particularly worthwhile for a photo visit.
Alex also likes to take photos with his iPhone at so-called «lost places». These are abandoned or forgotten places that develop a special charm for many. The following picture of Alex shows for example an old hotel, which has already accommodated its last guest years ago.

A different kind of photo tip: Ask locals about so-called «lost places». This will give you an insight into particularly impressive stories and scenes of the region.
Often you will find photo subjects that are typical for the region in the suburbs and not in the city center itself. You will guess: In the city centers it is often touristy and hectic. But as soon as you don’t shoot directly in the center, you will find that you are outside the original character with the features typical of your destination. You can almost always photograph in these places with less hustle and bustle and in peace and quiet.
In this way you will be able to take photos of motifs that are typical of the region and have not already been photographed thousands of times. For example, if you go to Pisa and photograph the famous leaning tower, it may be a great photo – but it’s nothing special.
Speaking of motifs. Your photos will be especially meaningful if you make sure that your pictures have a subject in addition to the actual subject when you take them with your iPhone. This could be a person, a cat, a dog or a bird flying by. This is how your travel photos start to work and tell a story at home.

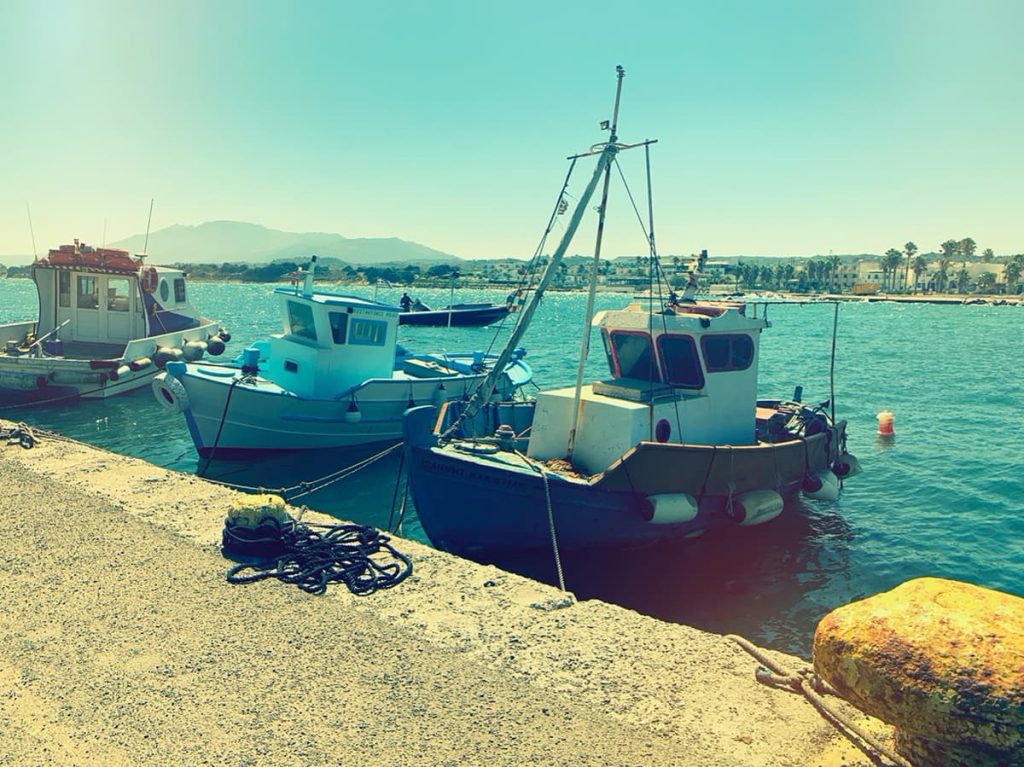
Photo visit to a small fishing village on the Greek vacation island of Kos: while the cafes and bars on the beach wait for tourists, the Iceman in the backyard brings supplies for cool drinks in the summer heat.
Guide to photographing landmarks with the iPhone
Landmarks have an almost magical attraction when photographing them while traveling. So if you do end up photographing the Leaning Tower in Pisa or the Eiffel Tower in Paris, Alex has some special tips for you.
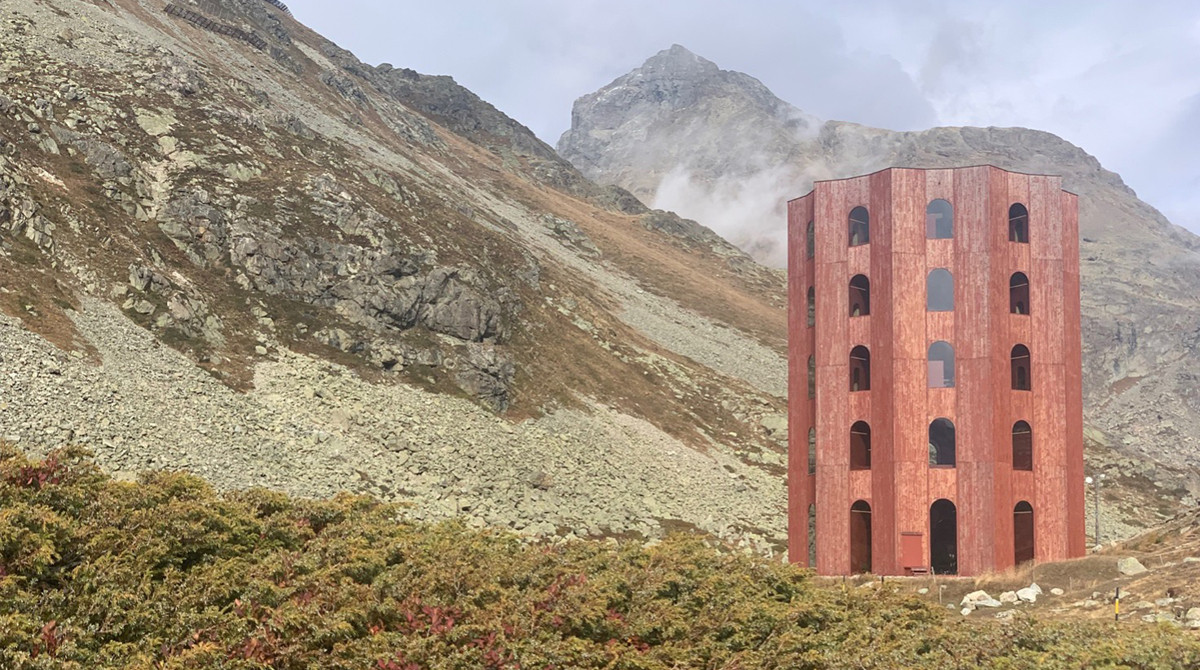
He shows you how to take iPhone photos of landmarks and sights using the Julier Theater, a theater, exhibition and assembly building built in 2017 at the top of the Julier Pass in the Swiss canton of Graubünden.
Step 1: Perspective and angle
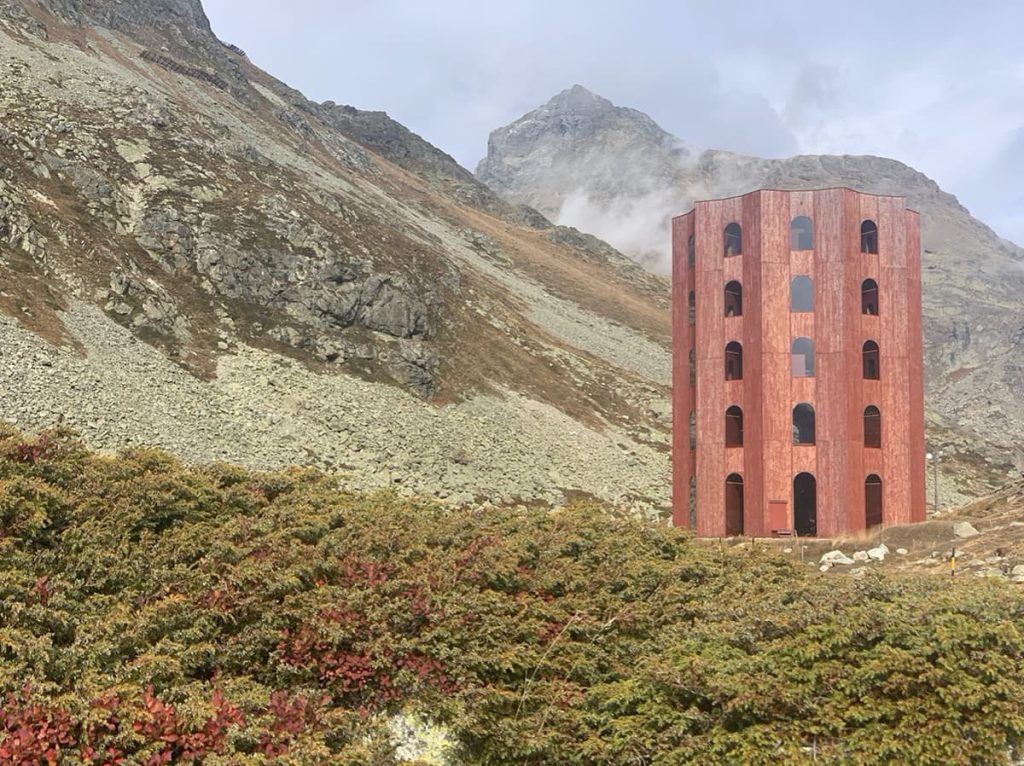
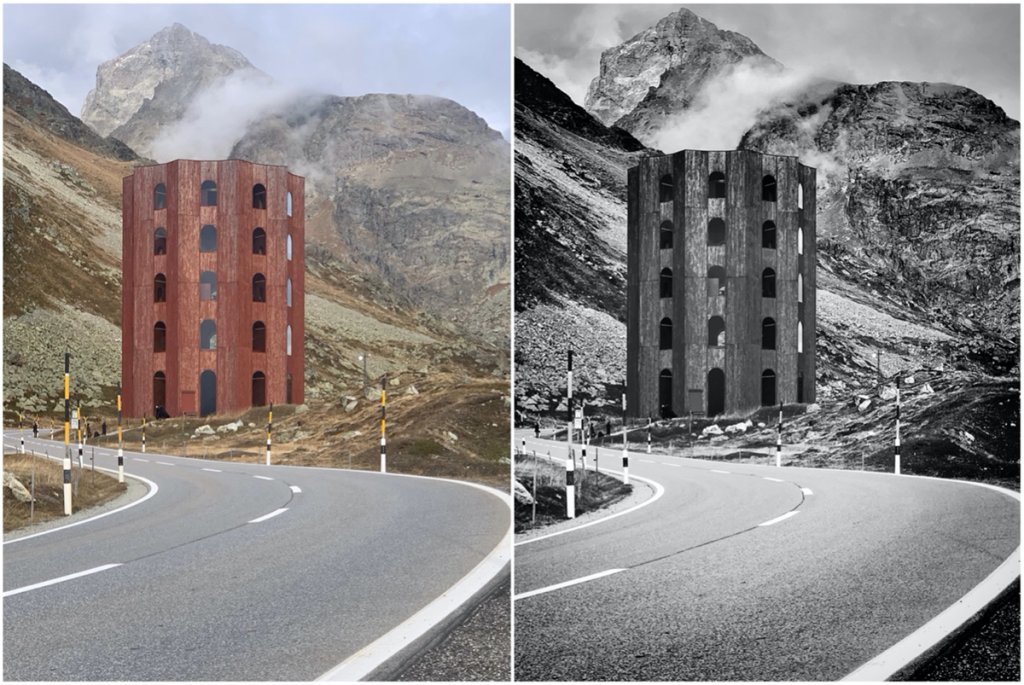
A picture of the theater building, photographed frontally in normal color and with usual perspective. That’s boring, isn’t it?
Try to photograph sights creatively and differently on your travels. Make the difference with your photos and don’t just snap another standard picture of a landmark.
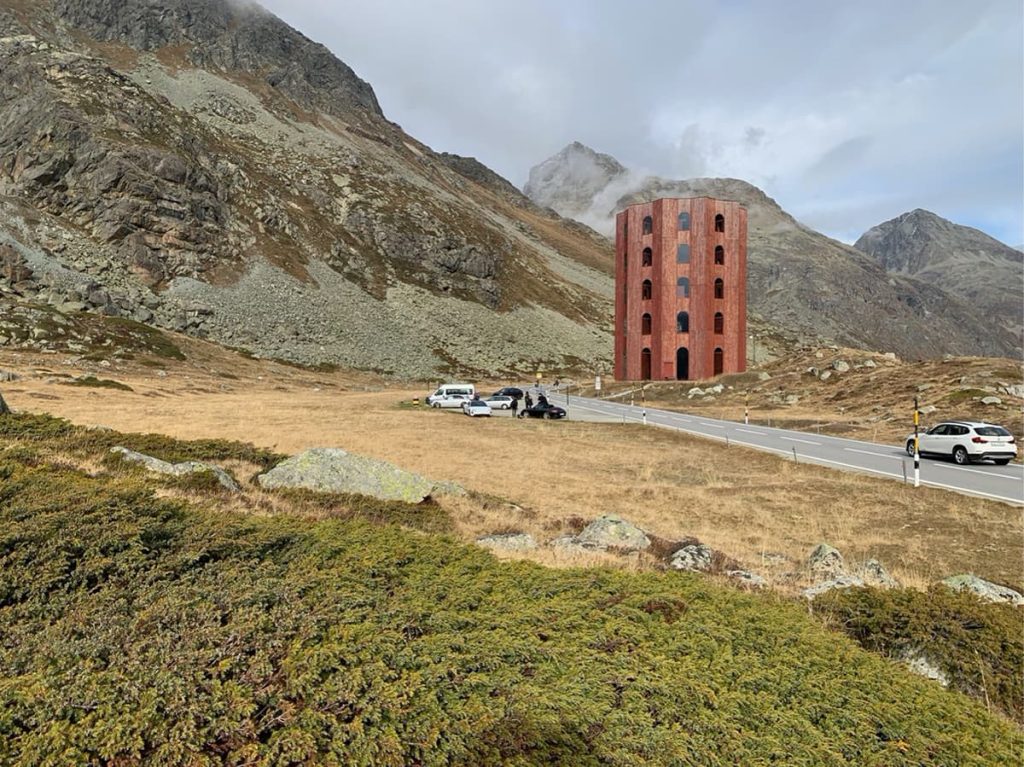
0815 snapshot: The Juliertheater simply «snapped» so uncharitably. Parked and passing cars distract from the actual subject, the theater.
Use the possibilities that your iPhone offers you. Play with the perspective, the different focal lengths and lenses, with the focus, but also with the image format (portrait or landscape).
Landscape format is particularly suitable for landscape photos because it gives the viewer of your landscape photos a broad view of the region. Also make sure that you align the horizon straight in your landscape photos.
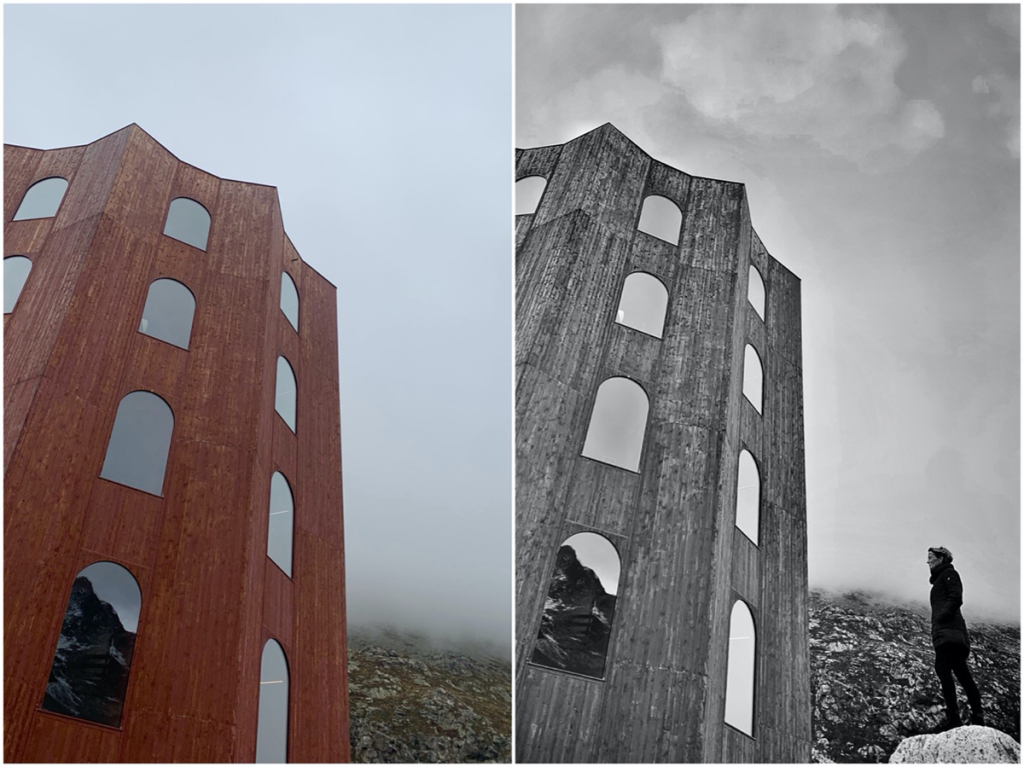
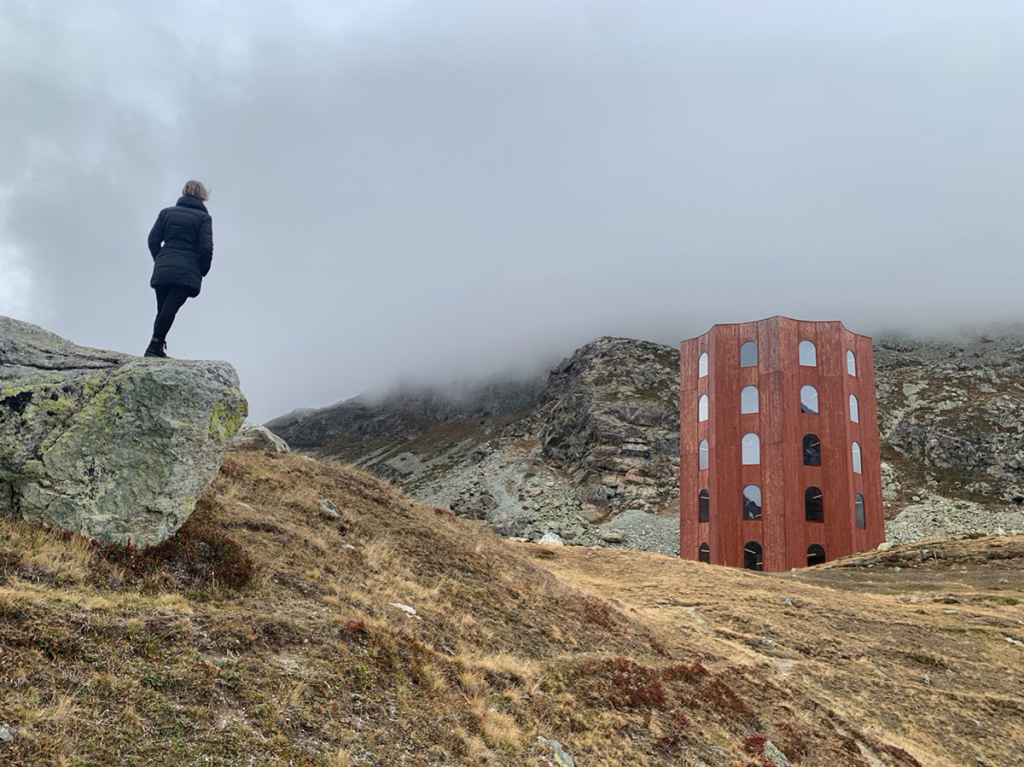
Change of perspective: The July theater in frog perspective. Shot from bottom to top) with the telephoto lens (2x), this isolates distracting elements in the image.
- Pro-tip #01: Choose a different perspective (for example the frog perspective), a different lens (instead of wide angle 0.5x or 1x the telephoto 2x) and thus isolate your subject in the golden ratio.
In this example, the parking lot with the disturbing cars disappears and the focus of the viewer of your image is completely on the subject. Your image will have a foreground (alpine roses), a middle ground with the subject and a background (mountain top), which gives your image depth and expression.
Step 2: Play with options
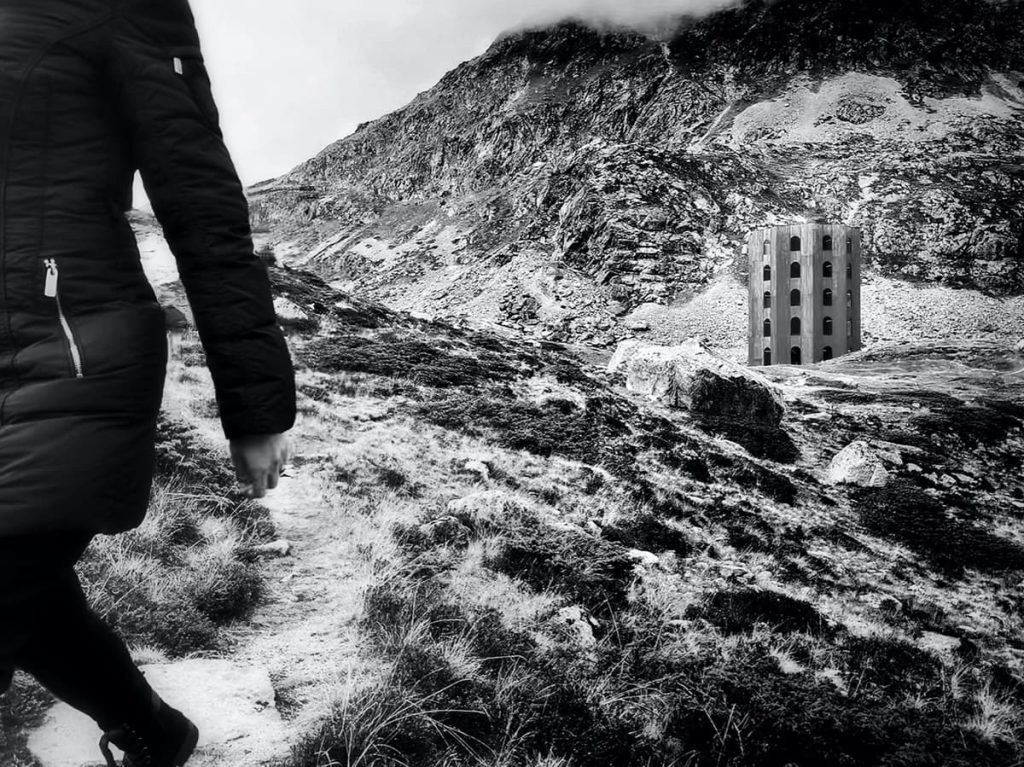
With a change of perspective (photographed here from bottom to top), you’ll succeed in taking great pictures of sights while traveling. Try to integrate an additional motif into your picture, which you show in the foreground of your picture.
This will make your picture more interesting for the viewer. What is this woman thinking in the next picture?
Juliertheater times differently: Integrate a motive in the picture (here: a person), and your travel photos begin to work and to tell stories.
- Pro-tip #02: By juxtaposing a large building with the woman, who is small in comparison, you underline the proportions and show how massive an impressive building complex is in comparison to the human being.
This gives your picture additional expression! Ask yourself also: Why is the color needed in the picture? Does the color have a special function in the picture, does it strengthen the expression? Or does the image look more appealing and mysterious in black and white? Play with these options and pay attention to the reactions of the viewers. They will give you good clues about the effect of your images.
Step 3: Guide lines and diagonals
Are you familiar with the term «leading lines»? In photography, this is the term used to describe elements with which you give expression to your photos and direct the viewer’s gaze in a targeted manner. This can be seen clearly in the next picture.
Guiding lines give your image additional depth and direct the viewer of your photos to the subject.
- Pro Tip #03: You can use guide lines to increase the depth of your image and draw the viewer into the picture.
In the example image, Alex places the road on the Julier Pass in the foreground in order to lead the viewer directly to the subject (in the image: middle ground) via this guide line. The massive mountain range (in the image: background) gives the photo additional expression.
Note: As a viewer of this image, you are literally drawn into the picture. The dramaturgy in the picture is additionally strengthened by the image processing in black and white afterwards.
Make a picture balanced: Design your photos in such a way that you show a subject in the picture in addition to the subject. Diagonals in the picture (here the woman and July theater) provide harmony.
- Pro-tip #04: Diagonals and lines can lead the eye in a picture. Both are important ways of shaping an image. The advantage: The eye remains in the picture and this is perceived more intensively. If diagonals and lines are in the picture, our eyes follow the lines.
In the example image, your gaze as a viewer is directed from the woman to the Juliet theater, which can be seen in her field of vision. What do you think she was thinking at that moment?
Step 4: Frame
The viewfinder, respectively the sensor of your iPhone camera, forces you into a fixed aspect ratio. Only in the rarest of cases does the subject you find fit exactly into the format – Alex knows this from intensive experience as an iPhone photographer.
That’s why you should always crop the image a little more generously when taking photos. This way, you can make sure that everything you want to photograph as part of your travel photography is visible in the picture.
Frame your photo: This is how you add expression to your iPhone photo by cropping it.
By cropping a subject, you frame your photo and give it extra expression. In the example shown here, Alex integrates a person at the left edge of the picture in addition to the July theater. By cropping this person, Alex provokes an interaction in the viewer. Who is this person? What has happened there? Is she on the run? Do you notice how the image now tells a story?
- Pro-tip #05: When photographing with your iPhone, don’t do the image editing right on the spot. When shooting on location, try to capture as many different photos as possible so that you can give your image the right frame afterwards when editing the image.
To do this, it’s always good to take several photos of a particular scene and, if necessary, shoot in live or continuous mode.
Tips for your vacation photography: Avoid these mistakes
When taking photos while traveling, make sure your iPhone’s lenses are clean before shooting with it. When you’re on vacation, it’s easy to forget to clean your camera lenses first because you’re so fascinated by the scenery or sights.
Because your iPhone is often in your pocket, the camera lenses quickly get dirty. A mistake that can lead to blurred images in travel photography. That’s why Alex recommends using a case for your iPhone when traveling. This not only protects the entire smartphone in general, but also the camera lenses in particular from unwanted dirt.
- Pro-tip #06: When taking night shots or photos with little light, your iPhone will automatically expose longer, which can also lead to blurriness in the photo. A tripod is therefore a useful companion when traveling. This will help you take great photos with your iPhone. If possible, take photos in RAW format in poor lighting conditions.
How do you take the best photos on vacation?
One of the most important questions Alex is always asked: How do you take the best photos on vacation? When is the best time, what light is best? Should you take photos in the morning, at lunchtime or in the evening?
What time of day you take your photos while traveling has an impact on the effect of your pictures. Depending on the time of day, the colors and contrasts in the picture look different. This has to do with the angle of the sunlight, but of course also with the weather.
The time makes the picture: When traveling, you should always consider at what time you want to take pictures. Various apps can help you prepare.
Particularly popular when taking photos while traveling are targeted snapshots of sunsets. For these photos – as with landscape photos – make sure that you align the horizon of your iPhone photo straight.
To do this, activate the grid lines in your camera app. This way, you can see a grid when you take a photo, which you can use to align your image optimally. Live or continuous mode, RAW format, grid lines: If you are unsure about the most important settings of the iPhone camera, take a look at the linked blog article. All marked terms in this article are explained in detail by Alex.
A classic in travel photography: A photo of the sunset in the «Golden Hour» with a backlit subject.
Especially beautiful photos are taken in the «Golden Hour», i.e. in the soft, warm light in the early morning hours or towards evening before sunset. The blue tones in the picture come out particularly well after sunset in the so-called «Blue Hour». So it’s worth staying a bit after the sun has disappeared….
When you shoot against the low sun, people, animals and other photo subjects become visible as silhouettes, which leaves room for imagination. When photographing, try to integrate an additional motif into your photo here as well – as in the example above with the July theater.
Such high-contrast silhouette photos get a lot of attention from the viewer and leave room for imagination.
Sunlight as a challenge for photography on vacation
Taking photos during the day, i.e. in bright sunlight, is usually not ideal for great photos while traveling. The glare of the sun around midday makes for a very high-contrast image with lots of light and dark areas in the frame.
This makes exposing your iPhone photos – even if you shoot in HDR mode – more difficult.
Shooting around noon: If the sun is high above you at this time, shooting with your iPhone while traveling is a challenge.
In direct sunlight, you’ll lose detail in the bright areas of the image. On the other hand, if you expose so that the bright areas are clearly visible, the shadowy areas will look even darker and the details will be lost.
So if you’re traveling and shooting around noon, cloudier days are almost better. The light is not only less glaring and more diffuse, often it also has fewer tourists – a win-win situation for you and your picture 😉
Where there is light, there is also shadow
As mentioned earlier, when traveling, besides the time of day, the weather also has an impact on your photos. You can also judge the quality of light by the cast of shadows.
If there is a clear shadow cast by your subject, you are shooting in harsh and harsh light. On a cloudy day, on the other hand, the light is more diffuse, which is particularly suitable for beautiful portrait photos.
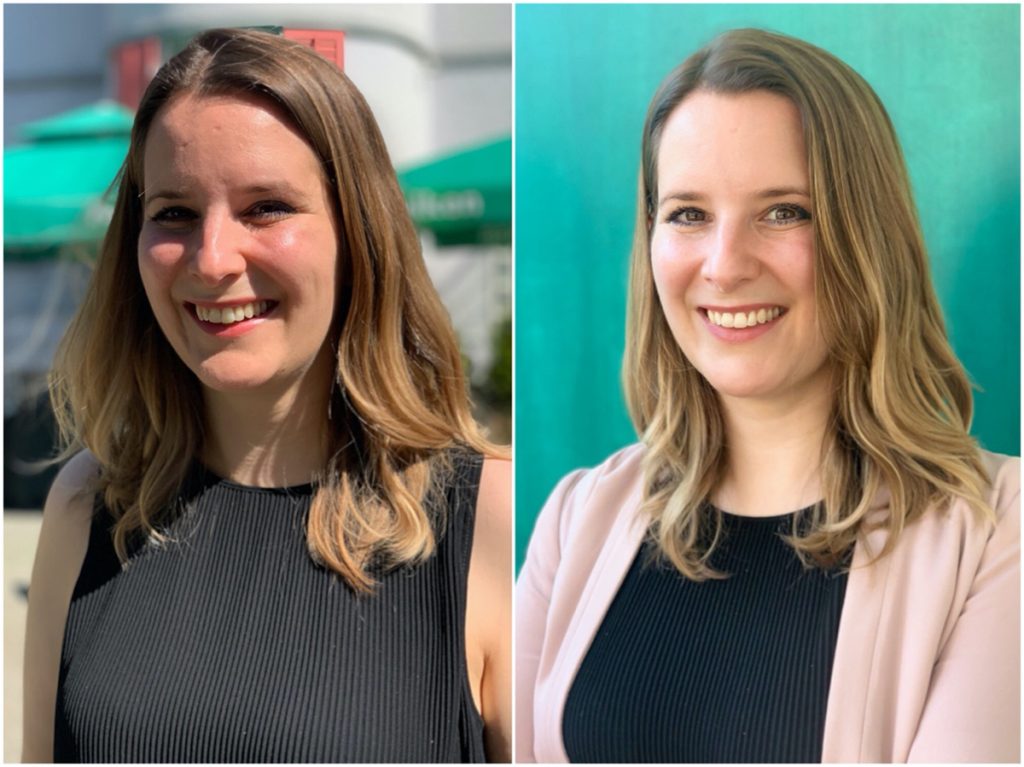
Comparison of hard and soft light: The portrait on the left was taken around noon in direct sunlight, the portrait on the right in more diffuse light.
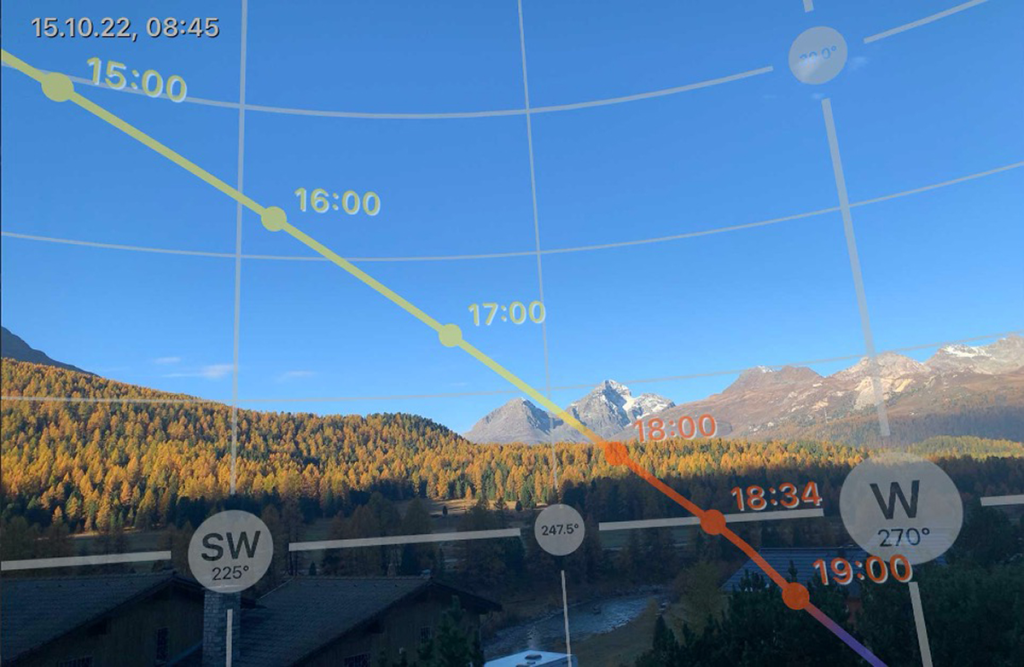
- Pro-tip #07: You are not sure about the position of the sun on your trip and at which place you can take great photos of sunsets? Alex recommends the paid app «PhotoPills» for this case. With this planning software, you can find out about the position of the sun at your travel destination and optimally plan your photo tour at your vacation and vacation destination.
At a glance: How do you succeed in taking photos while traveling with your iPhone?
Finally, here are Alex’s most important tips for taking great photos with your iPhone while traveling. And remember: Stay «strange» with your photos – that means: Now and then, consciously don’t stick to the rules of image composition and fall out of the frame with your iPhone photos. This is how art is created!
- Good preparation: If possible, inform yourself about your destination before your vacation. Before you leave, do some research in travel guides or on the Internet and let yourself be inspired by other people’s photos. But do not copy them. Also use apps like «PhotoPills» for this purpose.
- Take creative photos: Look for the unusual in your photos at the destination, play with the perspective, the image composition and work your way into the picture. Use your feet and the lenses built into your iPhone. Do not use the digital zoom.
- Time and weather: Be aware that the effect of your iPhone photos depends very much on the light and weather. If possible, try to photograph your subject on location at different times of day in different weather conditions.
Conclusion: You can learn travel photography
If you liked this post about travel photography with your iPhone, Alex would be happy about your comment below this post. Maybe Alex’s iPhone photography course is also something for you! In 30 video lessons, the professional photographer from Uster shows you his most important key techniques and principles.
It’s no secret anymore: What you need for great photos is not overpriced photo equipment. With your iPhone you have a small supercomputer in your pocket.
What you need is an understanding of how to take great photos with light, shadows, lines, shapes, colors, and expression. Photography is like music: just because you own a guitar doesn’t mean you can play it.
In his online course with the handy app for learning on the go, you decide when and where you want to improve your photographic iPhone skills. As a Handy Photo Club member, you also have access to the private Facebook group with hundreds of members who give you feedback on your iPhone photos as well as tips and inspiration.
If you’re interested in iPhone photography, looking for inspiration and support, you’ll get your money’s worth with Alex’s unique iPhone photography course. After this photo course you will take much more beautiful photos with your iPhone – and you will save the money for an expensive professional camera… 😉

More information about Alex Lörtscher:
https://www.alexloertscherfoto.ch