
We admit that on very cold days, it really takes a lot of effort to go out with your camera in search of motifs. But especially in winter, it’s really worth getting out and capturing the winter beauty of nature in photos. There is no such thing as bad weather in winter, because snow and ice conjure up incomparable and very special motifs, which can be seen in the landscape, but also in the very small things.
What is boring in another season can suddenly look very special in winter. The right equipment will get you the furthest in winter photography, as it will allow you to stay outside in the beautiful winter landscape for as long as possible. However, the technical aspects are also important for successful winter photography.

Winter light show on the Zugerberg, Switzerland
Tip 1: The right equipment for winter photography
Winter days can be very cold and you can quickly get wet when it snows. Therefore, make sure that you are well protected from the cold and wet on your winter excursions with your camera. In winter, warm and breathable functional clothing based on the onion principle is essential. Well-worn and waterproof winter or hiking boots with a treaded sole are also important. Long underwear, gloves, hat, scarf and warm socks are also part of a photographer’s winter equipment. Special gloves that allow you to turn the fingertips away are ideal for taking photos in winter. With these gloves, you can operate your camera without any problems and your hands stay nice and warm.

Snowstorm on the Faroe Islands
In cold and/or bad weather, you can protect your camera equipment with these tips
- Photo backpack with rain cover.
- Use a sun visor, as this also protects the lens from snowflakes or rain.
- Use a rain cover for the camera and lens or simply cut open a zip/plastic bag and use this as a cheap alternative.
- Make sure that you leave your camera in your photo backpack when you go inside after your winter photo session. This will allow your camera to adjust to the ambient temperature and avoid the risk of condensation damage.
- Microfibre cloth for the lens to clean snowflakes, water droplets and splashes on the lens.
- Tea towel for wiping wet equipment dry.
Extra tip for your photography equipment in winter:
In very cold weather, you should always have enough spare batteries for your camera. This is because the performance of camera batteries deteriorates very quickly in cold temperatures. Carry the spare batteries as close to your body as possible to keep them as warm as possible.
Packing list for winter photos
- Camera
- A selection of different lenses. Lenses with these focal lengths are useful for winter photography:
- Wide-angle lens (14-24mm)
- Normal lens (24-70mm)
- Telephoto lens (70-200mm)
- Polarising filter to eliminate unwanted reflections and glare.
- Grey filter for slow shutter speeds for waterfalls and streams.
- Pack a tripod – the low light conditions in winter require slower shutter speeds. Don’t forget the remote shutter release.
- Charged batteries
- Zip bag or rain cover for the camera in bad weather
- Warm, waterproof clothing
- Gloves/hat and hand and foot warmers if required
- Warm winter shoes with very good tread and even ice claws if necessary
- Thermos flask with hot tea
Tip 2: Preparation and planning for photography in winter
Good planning is important for an impressive winter shot. Firstly, you should think about which photo motifs you would like to capture. Take inspiration from other photographers who have already captured beautiful winter scenes.

Neuheim in the canton of Zug, Switzerland
Choose the perfect location to get the photo you want. Think about where you have a beautiful view of the landscape or where you have a good chance of finding snow-covered fir trees. You can also use maps or online tools such as Google Earth to get an idea of the local conditions.
The right time is important for capturing a winter photo. Especially in winter, twilight is the ideal time to capture beautiful moods. Use planning apps to determine the exact time for sunrise and sunset. You also need to keep an eye on the weather forecast in order to be in the right place at the right time.
Ideally, you should take the time to scout and visit your location for the winter shoot in advance. Take a few test shots and return to the location when the conditions are perfect and it has snowed freshly, for example.
Extra photo tip:
Watch your steps When you arrive at your chosen location, think carefully about the position from which you want to take the photo and where you are going to step. This is the only way to ensure that you don’t ruin your subject with your own footprints. This is particularly important in fresh snow. These footprints might distract unnecessarily from your main subject in your winter photo.
Tip 3: The basic rules for image composition also apply when photographing in winter

Rigi, Switzerland / Bernina Pass, Switzerland
Rule of thirds:
The image is divided into thirds vertically and horizontally. Important image content such as the horizon or other striking motifs should ideally be positioned in one of the intersections / fields.
Pay attention to the background and surroundings:
The background also often determines whether a photo looks good or not. As a rule, it is important that nothing disturbing or dominant distracts from the subject of the photo. Look carefully through the viewfinder and pay attention to objects that could interfere with the picture (e.g. cropped trees, bushes or power lines).
Leading lines and geometric shapes:
Look out for leading lines, curves or triangles in the landscape. These can be round hills, rivers, railway lines or mountain peaks, for example. Try to align your image composition with them.
Perspective:
It often helps to move the camera slightly to the left or right, up or down to optimise the composition. Slight changes in positioning result in completely different images and perspectives. Therefore, even when taking photos in winter, plan enough time to check whether the composition should be changed slightly.
These are other important aspects of image composition that also apply to winter photography:
- Use mirroring
- Framing the motif thanks to symmetry
- Combination of complementary colours
- Crop the subject with depth of field
- Look out for diagonals and triangles
- Letting the subject breathe in the landscape
- Giving the image depth with different layers
Tip 4: Choose a suitable winter motif

Zugerberg in the canton of Zug, Switzerland
Winter offers an abundance of photo opportunities. There are no limits to your creativity when it comes to winter photography. Here are a few ideas for your winter photo excursions:
- Winter photos are predestined for black and white shots. The limited colour gives your winter photos a graceful effect and highlights the snow beautifully.
- A landscape covered in deep snow with winter trees, especially snow-covered fir trees, offers a wonderful photo motif.
- Photographs taken in the blue hour are particularly beautiful in winter. Above all, snow-covered towns and villages with their artificial light sources offer very beautiful motifs.
- Especially in winter, wonderful light situations are created during sunset and sunrise as well as at dusk.
- The night hours in winter can also be used for magical photo shoots. A starry sky or northern lights make a winter landscape glow. You can find our tips for aurora photography here.
- Forest scenes in winter have something magical about them.
- Pay attention to small details, because winter offers great subjects for macro photography.
- Find icicles, small ice crystals or interesting structures in the snow in the winter landscape.
- Small rivers and streams in winter dress.
- Ice structures on frozen lakes.
- Mystical foggy moods.
- Add a creative splash of colour to your winter photo with a colourful hat or jacket. You might also find an exciting colour on a building or other object that you can use as a motif in your otherwise white winter landscape.
You can find lots of creative inspiration for exciting winter motifs on Instagram under the hashtags #winterwonderland, #winterlove and #wintermood.
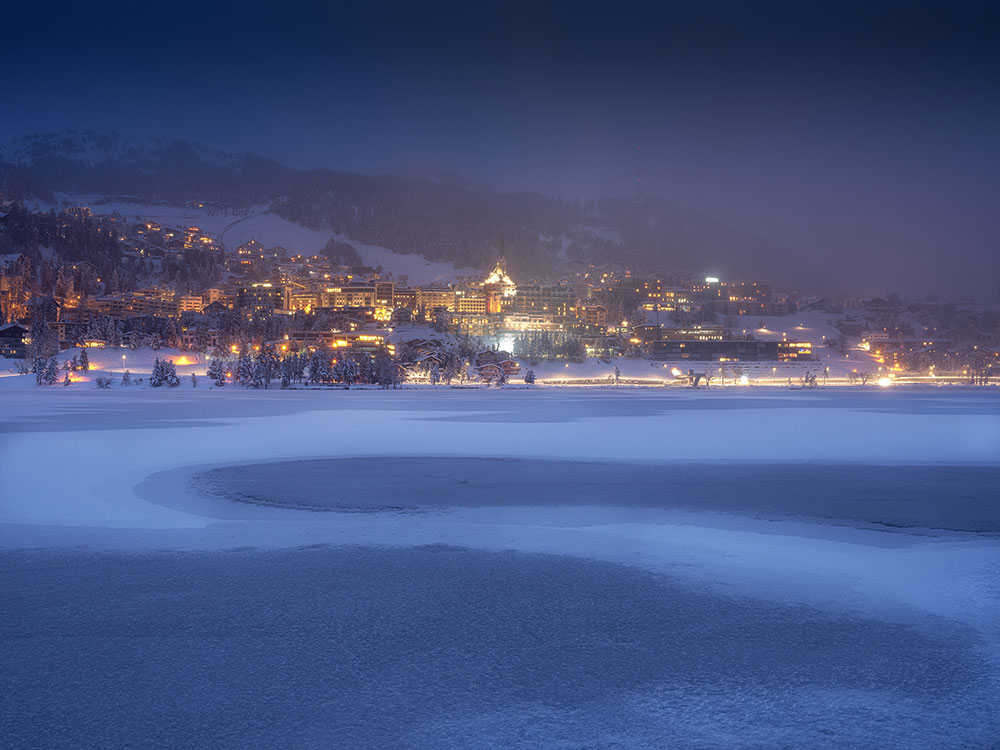
Blue hour in St. Moritz, Switzerland
Tip 5: The right camera settings for photos in winter
- If possible, take photos in RAW format. This allows you to get the best out of the image and gives you many more options for post-processing.
- Switch off the image stabiliser on your lens and use the tripod – this allows you to use a closed aperture (large depth of field) even in gloomy winter weather
- Select the ISO sensitivity as low as possible (100 or 200) to avoid noise in the image The aperture is a great tool for beautiful winter photos. For a winter landscape, it is best to choose an aperture between f/8 and f/16. The smaller the aperture, the greater the star effect of the sun (e.g. f/16).
- Choose the right shutter speed depending on the desired effect – slow or fast. Especially in bad winter weather with snow or rain, you have many creative options. For example, you can use a fast shutter speed to freeze the snowflakes in the picture or use a slow shutter speed to show the falling flakes as white stripes. To make the snowflakes clearly recognisable in the picture, you should take photos against the light. Use a slow shutter speed for waterfalls and streams. This creates a beautiful wiping effect. The water will appear soft and flowing.
Extra tip for taking photos in the snow:
In white snow, the lighting conditions are so extreme that your camera may be confused. Correct these settings to take a great winter photo.
Exposure:
To prevent your snow photos from becoming grey or too dark, correct the exposure by +0.7 to +2.0 EV depending on the lighting conditions. It is important that your main subject is not overexposed and that the histogram on the right-hand side does not touch.
White balance:
With the automatic white balance, photos in the snow often look bluish. If you don’t want to correct this in post-processing, it’s best to use the “Daylight” white balance or enter the ideal Kelvin value manually.
Lack of contrast:
If your winter photos lack contrast, you can correct this in post-processing using the “Contrast” slider and possibly the “White” and “Black” colours.
Snowflakes:
You can make snowflakes visible in your photos with the ideal exposure time. We recommend an exposure time between 1/30s and 1/100s.

Snowflakes against the light, Spitsbergen
Tip 6: Capture your winter photos
Winter stories:
A photo book is the ideal way to showcase your winter adventures. From snowy forests to impressive mountains – personalise each page and bring your pictures to life. Choose from different layouts to perfectly capture the mood of each moment. From grand panoramas to intimate details, a photo book has room for all your winter stories.
Decorate your home:
You can design our desk calendar with or without a calendar. Without a calendar, it becomes a photo display and decorative highlight. Create a personalised calendar with your best snow photos.
Winter impressions in large format:
Let your best snow pictures shine on the wall. With our high-quality wall murals, every room becomes a place of winter magic. Choose the size, material and frame to perfectly showcase your favourite photo.
Tip 7: Photographing in winter is particularly successful here
Taking photos in winter is often a challenge. With these photo tips, you’re sure to be well prepared for winter. Tackle your winter photos with the right equipment and settings in your camera and you’ll see that it’s worth it.

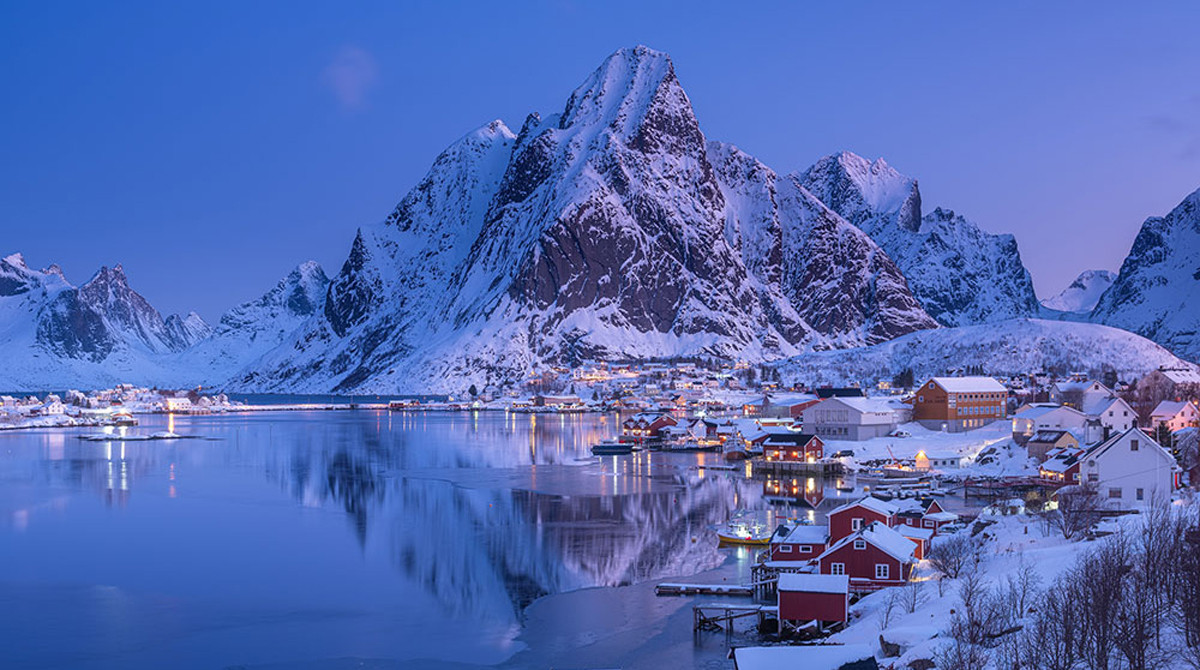
Sunrise on the Lofoten Islands, Norway
But where are your chances of finding wintry motifs particularly good? The Swiss photo tour and workshop organiser Amazing Views Photo & Adventure Tours knows all about winter photography and knows which destinations are perfect for winter photography.
On these photo trips and workshops, you will always be in the right place at the right time with your camera. For professional support with your winter photos, it’s best to travel with Amazing Views to the wintry Engadine or to the polar bears in Spitsbergen.
With Amazing Views, you can chase beautiful northern lights on the Lofoten Islands in Norway or marvel at the magnificent winter landscapes of the island of Senja.
In Canada, with a bit of luck you can even photograph cute polar bear cubs in the snowy landscape.

Winter wonderland with northern lights in Lofoten, Norway
Winter is particularly beautiful in all of these destinations and with Amazing Views Photo & Adventure Tours you are sure to find countless motifs for winter dream pictures.
Have fun and success with your winter photography.
This article was provided to us by Amazingviews. Thank you very much!
www.amazingviews.ch